The (unofficial)
RWS-54 Home Page
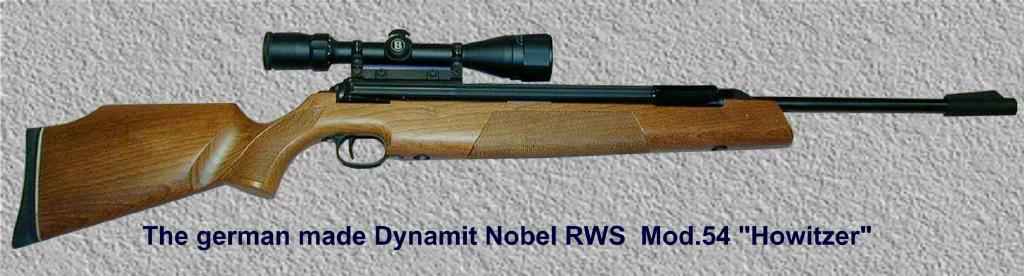
I'm a proud owner of an RWS-54 airgun. This
amazing gun is very accurate and powerful. It is easy and fun to shoot too!
Even so, you can find a lot of posts out there, complaining about the heavy
trigger and short spring life. This page should help beginners and others in
receiving useful 1st. hand info and sharing their own experiences. A
specialized forum will be linked to the page soon.
I have experienced the heavy trigger in my
gun. I've read about Vortec and it's trigger sear, but
couldn't reach' em either. So, I decided to address this issue by myself! After
studying the trigger geometry I found a simple solution which works great. By
filing down 1 mm the 1st stage adjustment screw seat, I created plenty of
adjustment room!
I also decided to address the spring issue
right at the beginning and installed a Maccari GSI kit on my gun, turning it
into a delightful one. For all those asking if it's worth, I can only say: You
have to experience it to believe (thanks Jim)! I wish to thank Bruce Itterman,
whose valuable info made it easy to disassemble and assemble the gun as well as
lubing the new spring before installation.
One more word: By doing any of these mods. as well as by replacing the trigger sear with a Vortec's one
(in the rare event you can get one) you'll probably blow the RWS warranty. Just
be aware of this.
Have fun, keep shooting and check this place
from time to time for new info!
Roland Martens
Email:
|
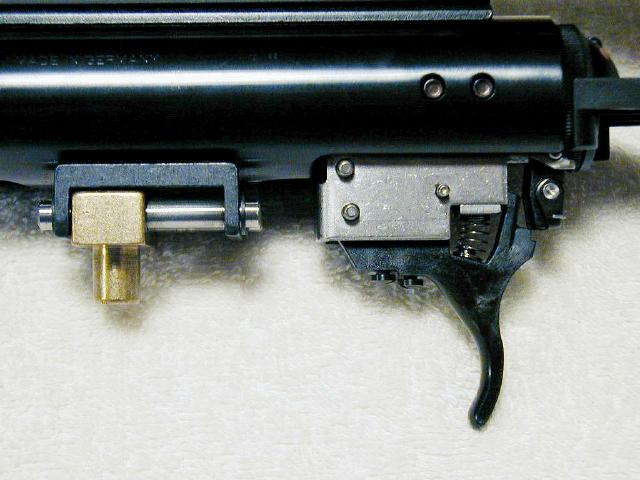
The RWS 54 trigger before the tune. 1st stage screw shown 1st from left to right. |
|
|
The RWS54 trigger after the tune. By filing down approx 1 mm the 1st stage adjustment screw seat, you will
create more room for adjustment. For this tune you only will need a
screwdriver and a file. Once you took off the action, you have to take off
the plastic trigger. Carefully remove the trigger pin and pull out the
trigger. Good thing about this mod: You can still get the original adjustment
if desired. |
|
|
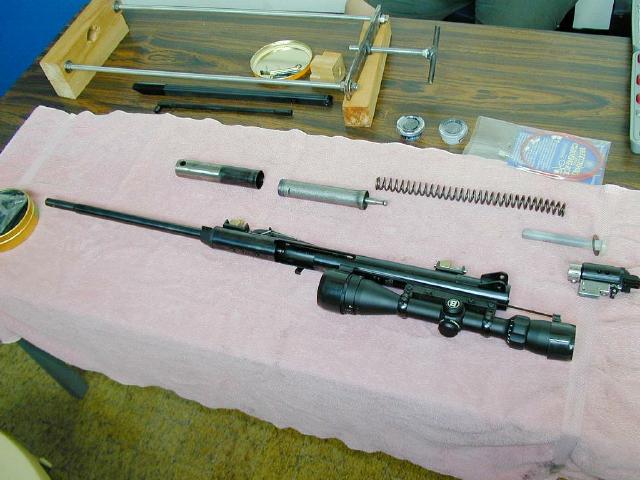
Dismantled RWS54 ready for the GSI Kit. Few parts, few tools, easy job (the spring compressor, a "must". Take your time cleaning up everything and applying the tar and moly. If you are not experienced, don't disassemble the trigger assembly. Just be careful with the safety position during assembly. |
|
|
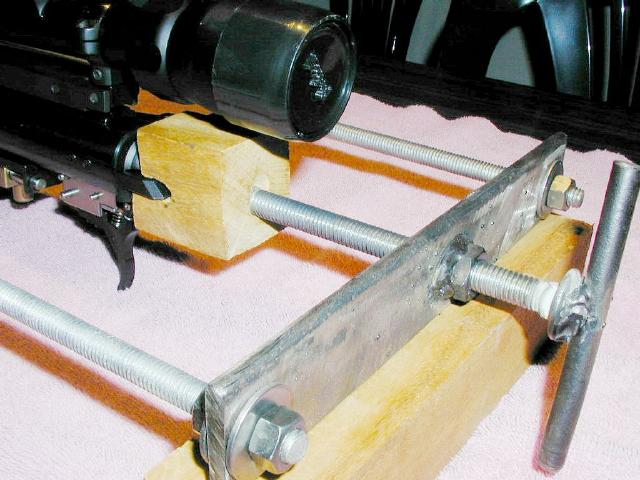
An easy to build spring compressor. This easy to build spring compressor makes it very easy and safe to exchange
the spring of any side lever RSW gun! |
|
|
Spring compressor detail. Here you can appreciate the rear end of the spring compressor and the
wooden block pressing the plastic cover of the M54 action rear. |
|
|
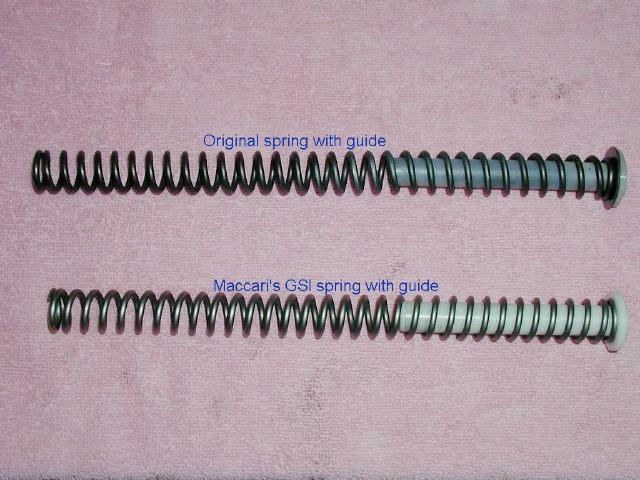
Spring comparison. On the upper part you can see the original RWS spring and guide, showing
a light bending right after 200 shots, probably due to the loose tolerances
between plastic guide and spring inner diameter. On the lower part you can appreciate Maccari's GSI spring and guide.
Much tighter tolerances, better finish of spring seats, tougher guide. |
|
|
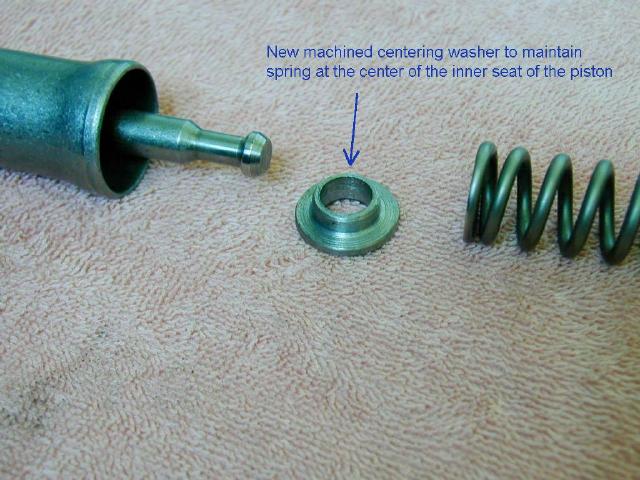
Custom made centering washer. For this I'll probably be called an eccentric, but I realized there is
plenty of room between spring outer diameter and piston inner diameter,
allowing the spring to seat at the piston bottom not exactly centered. This
could lead to further vibrations. Therefore I made a centering washer which will maintain the spring
exactly in the piston center yet adding a negligible amount of moving mass |
|
|
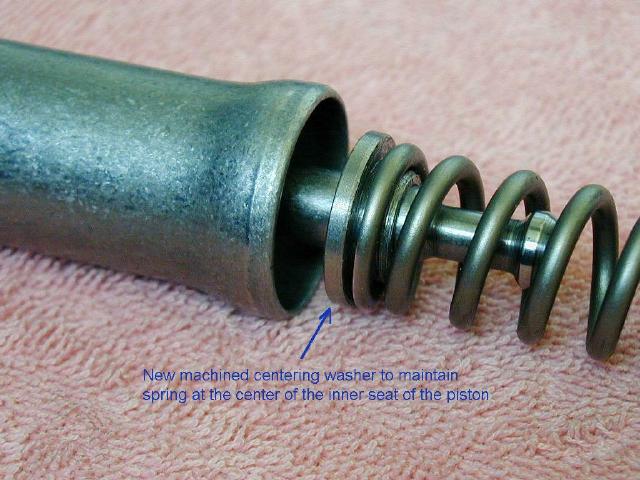
Custom made centering washer (installed). The position of the spring centering washer. Important last minute info. from J. Maccari: On some RWS sidelever guns the addition of a washer will prevent the trigger to engage. For this reason, the GSI kit does not include a washer. Maccari is already preparing another kit with a 1 coil shorter spring which does include a washer. Take a look at his site. |
|
|
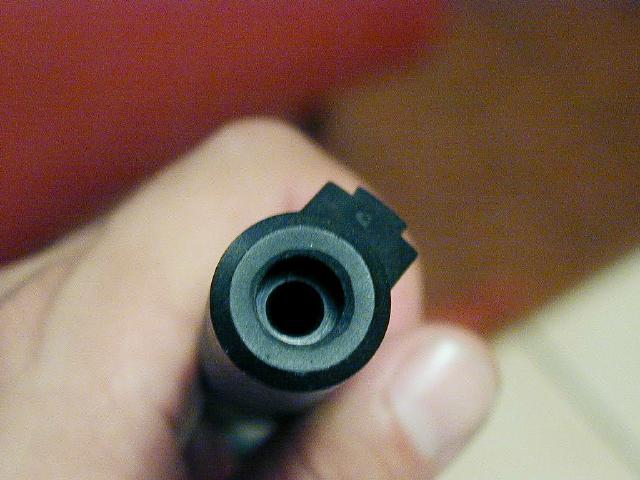
A better breathing for my gun. On another airgunning web page I saw a high speed photography showing
a pellet exiting the muzzle. You could also view the swirls caused by the
expanding air almost surrounding the pellet. The 54 has composite material
muzzlebreak with a hole slightly wider than the actual bore. This could let
the expanding air affect the pellet's trajectory. I drilled a bigger hole through the muzzlebreak creating more room for
the air to expand freely. Remember to take apart the muzzlebreak if you want
to do the drilling. |
|
|
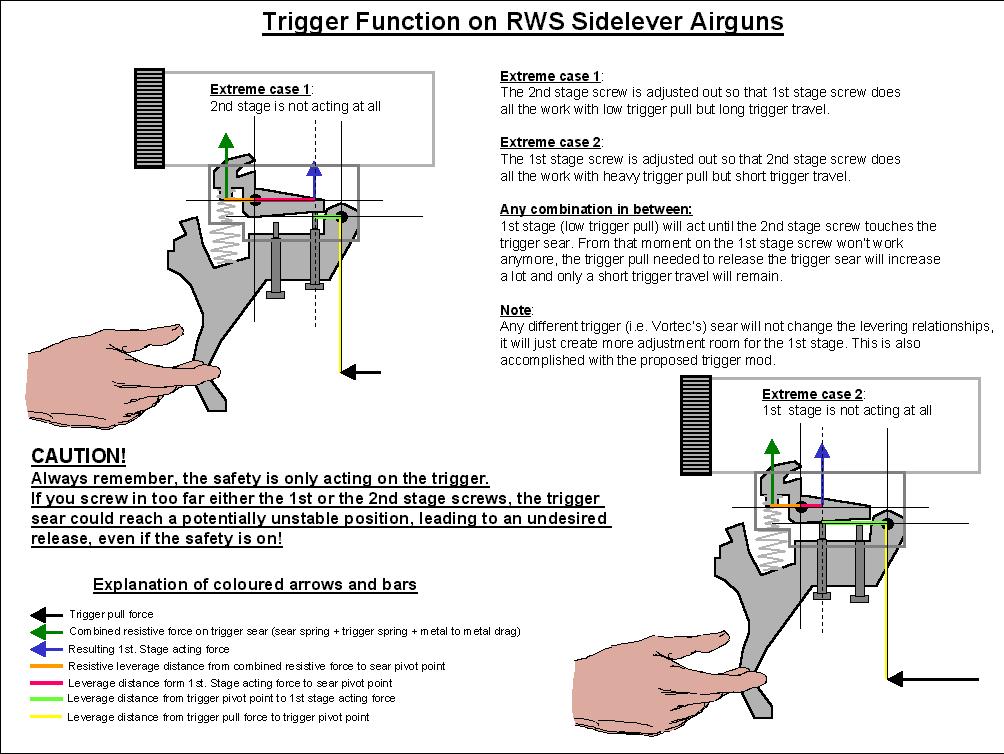
How does the trigger function?. Here a short explanation about how does the trigger work. I hope it helps
to understand the function of each adjustment screw. |
|
|
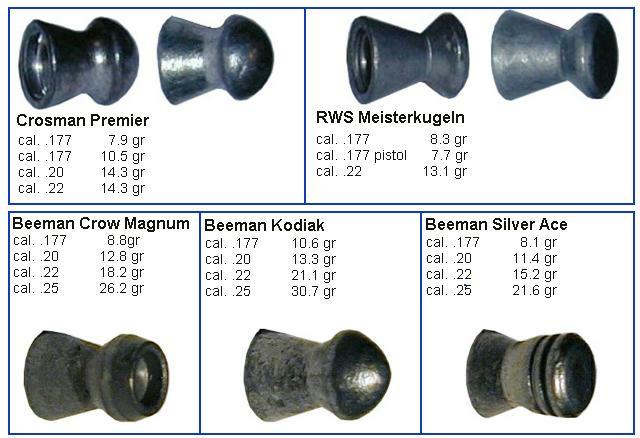
Some ammo I tested. Here a few pellets at a close look. Pay attention at the smooth finish
of the Crosman Premier. This is the top performer in my gun. Very fast, very
accurate at long ranges! Crow Magnum is good at close to medium range, but inaccurate at long
ranges (40 Yards and beyond). Silver Ace has a good grouping too. Cons.: Very expensive. Kodiaks are way too heavy for my gun. Just for test. Last minute...got some Meisterkugeln from SS. These pellets are amazing. Very, very accurate at close range. Have not tried them at long range yet. |
|
|
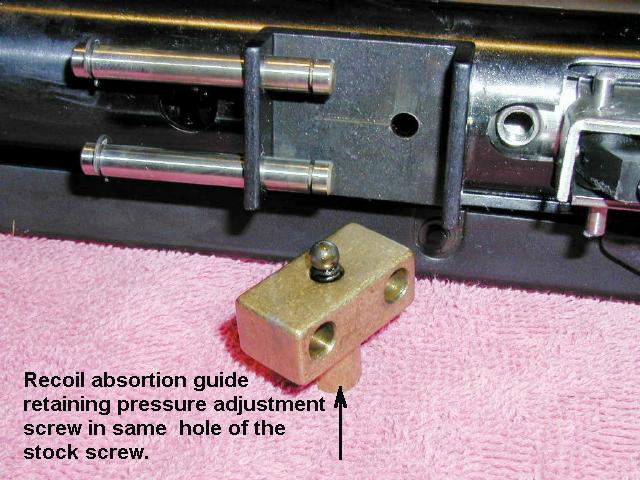
Recoil absorption system: Regulation of position
holder bearing. On the rear rail of the recoil absorption system there is a spring
loaded bearing located in the same hole the stock
screw fits in. Spring force can be modified by means of an inner screw. To
adjust the screw just unscrew and take off the rear stock screw. You'll be
able to insert an Allen wrench through the hole. Adjust the screw so that you can slide the action backwards doing some
effort. Better put some blue Locktite on the screw to secure it's position. If you begin loosing accuracy, check this adjustment...Very important
hint! |
|
|
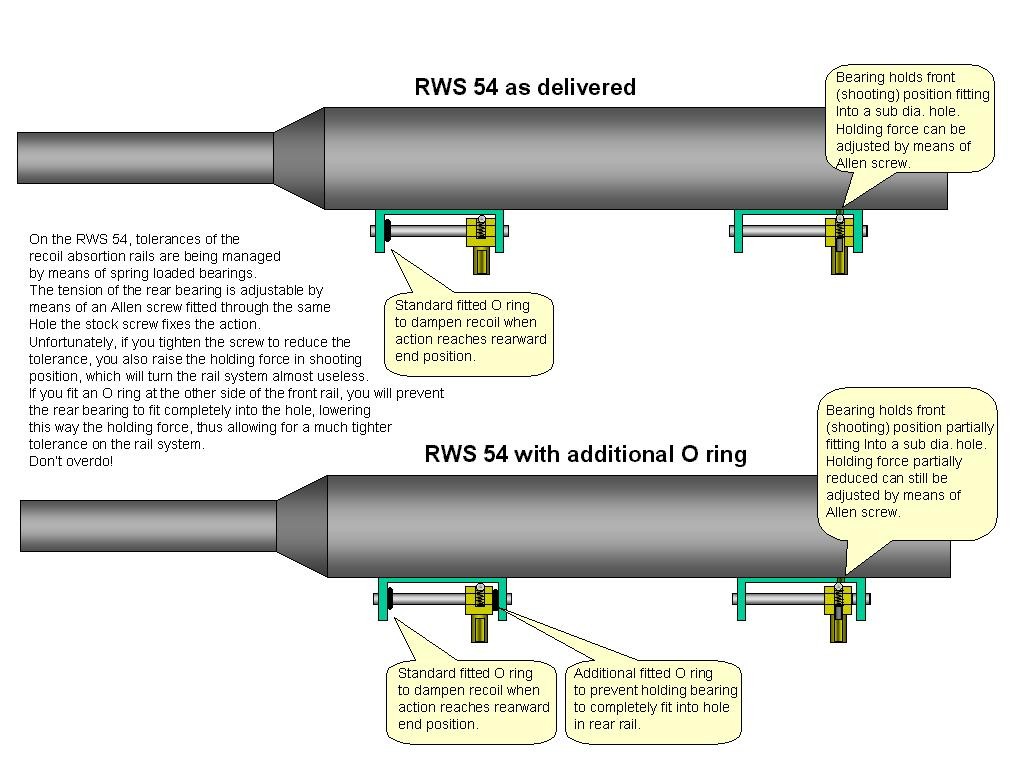
How to get a better fit of the sliding action
without jamming it If you tighten the Allen screw within the rear sliding block too much,
the sliding action will get stuck. Add a simple O ring at the other side of
the front block and you'll be able to tighten the screw much more without
jamming the sliding action. |
|
|
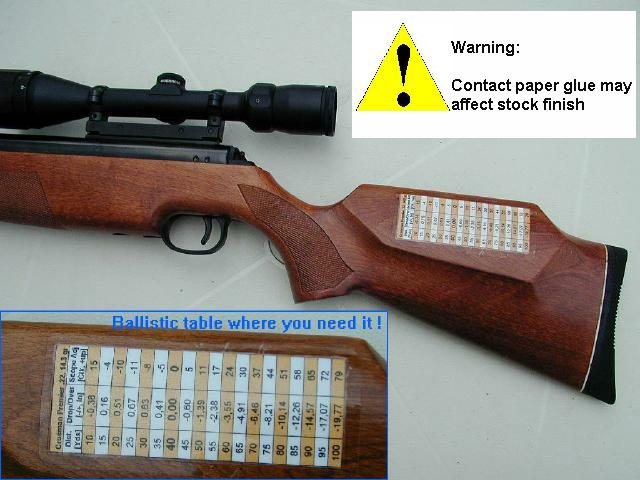
Pellet Trajectory... Where
I need it ! Print out a table with the trajectory data for your commonly used pellet
and fix it to the stock with transparent contact paper. The result is water
resistant and with a 90 deg turn of the gun, you will be able to read it! |
|
|
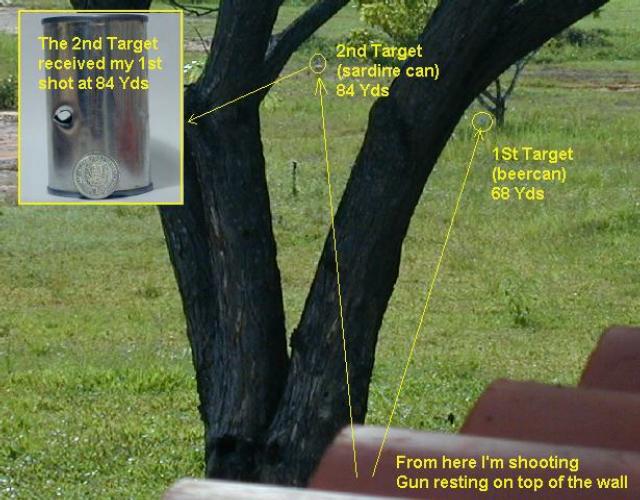
Long Range Shooting I like LR Shooting. It's breathtaking to wait for the pellet to reach
the target. I set up the 2nd target the night before. At the morning I first
tested accuracy on the 1st target placed at 68 Yards (just 1 shot) and then
released the premier that punctured the sardine can. Still enough energy at
that distance. Distance was measured with Bushnell Yardage Pro 500
rangefinder, trajectory calculated from data found in SS "Our Take"
for tested RWS 48...pretty accurate. Photography was taken with an
|
|
|
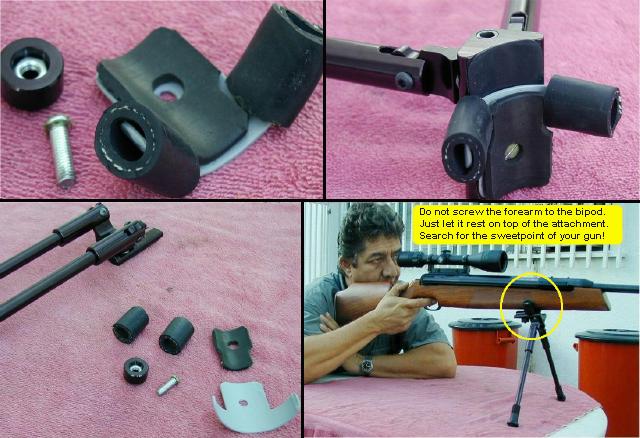
The Bipod
I was warned by Kevin from SS, the bipod is not
suited for the M54. They are right. If you try to attach the bipod to the
forearm screw, you will jam the recoil absorption rail for sure. My
solution:
Make a small "V" out of a piece of 2"
conduit, add some pieces of rubber sheet, rubber hose, a screw and a nut, and
you will have an excellent and very stable platform for LR hunting and
shooting. Just let the forearm of your gun rest on top of the bipod, at the
sweet spot you have determined for regular hold. This way you can also
stabilize your gun against a wall or other inclined surface, very practical! |
|
|
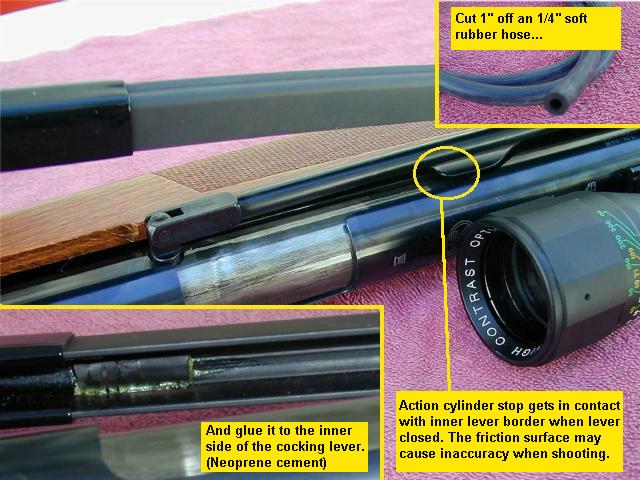
Cocking lever mod (only for M54). The M54 is fitted with a stop for the action cylinder, which leads the
whole action to automatically be pushed forwards when you drive the lever all
the way backwards. This part is separated from the action by some 3 ~4 mm. Unfortunately, the cocking lever leans against this stop when closed,
causing an undesirable sound and possibly influencing the accuracy when
action & lever rush backwards within the firing cycle. A simple piece of
rubber hose glued to the inner part of the lever (as shown) will remedy this
minor fit issue. |
|